Are you a proud caravan owner looking to protect your investment and ensure a safe and comfortable journey?
Let’s delve into why it’s vital to seal your caravan roof, how often you should do it, the materials needed for the job, step-by-step instructions for sealing, tips for maintaining a sealed roof, and common mistakes to avoid.
Don’t let leaks and damage ruin your travel plans – follow these essential tips for sealing your caravan roof!
Why Is Sealing Your Caravan Roof Important?
Ensuring the proper sealing of your caravan roof is crucial for safeguarding your vehicle against potential leaks, water damage, and weather-related wear and tear. A well-sealed roof provides essential protection for the caravan’s interior, preventing costly repairs and maintaining the structural integrity of the vehicle over time.
By effectively sealing the roof, you create a barrier that shields the interior from moisture infiltration, mould growth, and rotting of the caravan’s components. The sealant serves as a proactive shield against harsh elements like rain, snow, and UV rays, safeguarding the caravan’s materials and bolstering its durability.
Regular maintenance and inspections of the roof seal ensure that it remains intact, extending the lifespan of your caravan and preserving its value.
How often should you seal your caravan roof?
Regular maintenance and sealing of your caravan roof are recommended annually to ensure optimal protection and longevity. An annual check-up allows for early detection of potential issues and timely repairs, helping to extend the lifespan of the caravan roof and prevent costly water damage.
This proactive approach not only safeguards your investment but also enhances safety during your travels. By sticking to a yearly maintenance schedule, you are taking proactive steps to maintain the structural integrity of your caravan roof, which is crucial for overall vehicle safety. Regular inspections can help identify minor issues before they escalate into major problems, saving you both time and money in the long run.
What Are the Materials Needed for Sealing?
When it comes to sealing your caravan roof, you will require specific materials such as waterproof sealants, caulking guns, cleaning supplies, and protective gear. These essential materials play a vital role in ensuring effective weatherproofing and protection against leaks and water damage.
The waterproof sealants are the primary line of defence against water infiltration, forming a durable barrier to shield your caravan roof from moisture.
Caulking guns are indispensable tools for precise application, ensuring that the sealant is applied evenly and in all the necessary areas.
Cleaning supplies are crucial to prep the surface, removing dirt and debris that could compromise the effectiveness of the sealant.
Protective gear like gloves and goggles not only keep you safe but also prevent skin contact with potentially harmful chemicals during the sealing process.
Roof Sealant
Roof sealant is critical for effectively sealing your caravan roof. It forms a protective barrier against water intrusion, preventing leaks and potential water damage to the vehicle’s interior. Choosing a high-quality roof sealant is essential for long-lasting weatherproofing and maintenance.
Various types of roof sealants are available in the market, including silicone, acrylic, polyurethane, and asphalt-based sealants. Each type offers different benefits in terms of durability and application.
Proper surface preparation is key to ensuring a strong bond and effective sealing when applying roof sealant. It is recommended that the roof be cleaned thoroughly before application to remove dirt, debris, or existing sealant.
While opting for a premium roof sealant might entail a higher upfront cost, it pays off in the long run by providing top-notch protection against inclement weather and prolonging your caravan roof’s lifespan.
Caulking Gun
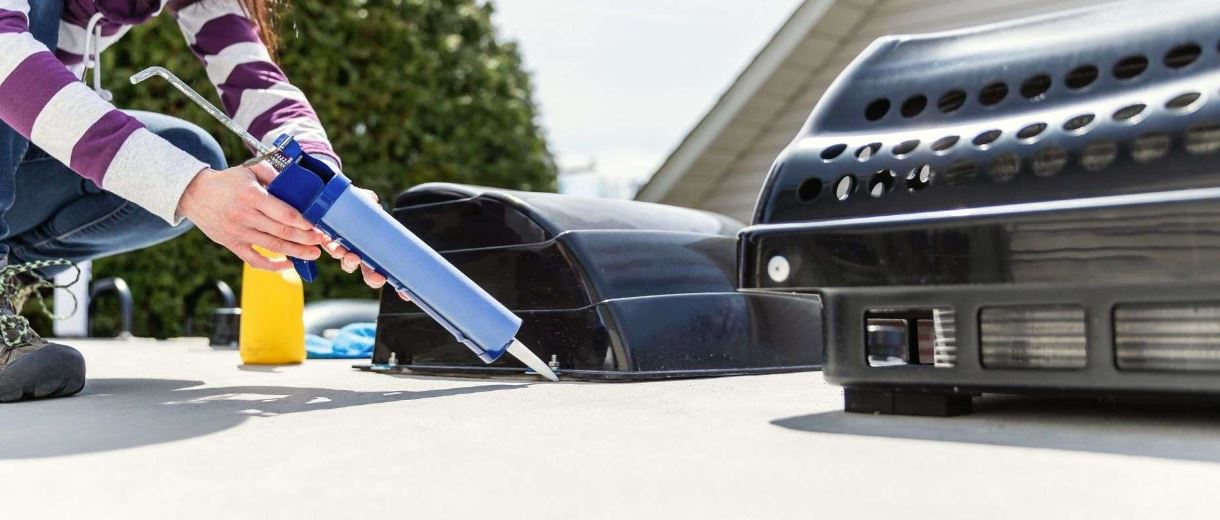
A caulking gun is a necessary tool for effectively sealing your caravan roof. It ensures precise and controlled application of sealant, especially in hard-to-reach areas or along roof seams and edges. Using a caulking gun simplifies the sealing process and helps maintain the roof’s weather resistance.
The caulking gun allows you to dispense sealant evenly along the roof’s surfaces without creating a mess. To use it effectively, load the sealant tube into the gun, making sure the nozzle is securely in place. Then, apply gentle pressure on the gun’s trigger to release the sealant while moving it along the desired sealing area. This tool is crucial in preventing water leaks and keeping the caravan interior safe from water damage caused by rain or moisture infiltration.
Cleaning Supplies
Utilising the right cleaning supplies is essential for preparing the caravan roof for sealing. Cleaning supplies help remove dirt, debris, and old sealant residues, ensuring a clean surface for the new sealant application. Proper cleaning enhances the sealant’s adhesion and promotes effective weatherproofing.
Using appropriate cleaning materials like mild detergent, a soft brush, and water before sealing the caravan roof is crucial. The mild detergent helps break down grime without damaging the roof surface, while a soft brush aids in gently scrubbing away tough stains. Water is essential for rinsing off the cleaning agents, leaving the roof spotless and ready for sealing. These steps ensure that the sealant bonds properly and forms a durable barrier against elements, preventing leaks and extending the lifespan of the caravan roof.
Protective Gear
Prioritising safety during the sealing process necessitates the use of protective gear such as gloves, goggles, and appropriate clothing. Protective gear shields you from potential hazards like chemicals, sharp tools, or falling debris, ensuring a safe and secure sealing experience. Wearing protective gear is essential for preventing injuries and accidents.
Along with gloves to protect your hands from chemical exposure and cuts, goggles shield your eyes from splashes and debris. Appropriate clothing acts as a barrier against spills and sharp objects, minimising the risk of skin injuries. These protective measures not only safeguard you but also enhance the efficiency of the sealing task by allowing focused and uninterrupted work.
Remember, safety precautions must be followed diligently at each step of the sealing procedure to mitigate any potential risks and ensure a successful outcome.
What Are the Steps for Sealing Your Caravan Roof?
Sealing your caravan roof involves several crucial steps to ensure effective weatherproofing and protection against leaks. From thorough cleaning and inspection to sealant application and leak checks, each step plays a vital role in maintaining the roof’s condition and preventing water damage.
- Kick off the process by thoroughly cleaning the roof surface to rid it of dirt, debris, and old sealant. Utilize a mild cleanser and a soft brush to prevent any damage to the roof material.
- Inspect the roof for any signs of damage, such as cracks, gaps, or worn-out sealant. Address any issues immediately before proceeding with the sealing process.
- When applying the sealant, ensure even coverage and follow the manufacturer’s instructions for proper application technique.
- After sealing, conduct a thorough leak detection test using water or a hose to check for any areas where water may penetrate. Repeat this process periodically to maintain a watertight seal and extend the lifespan of your caravan roof.
Clean the Roof Thoroughly
Thoroughly cleaning the caravan roof is the first essential step in the sealing process. Removing dirt, debris, and old sealant residues ensures a clean and smooth surface for the new sealant application. Proper cleaning not only enhances adhesion but also allows for a comprehensive inspection of the roof’s condition.
This detailed cleaning process is crucial as it helps identify potential issues on the roof, such as cracks, leaks, or damage that may have been hidden beneath layers of dirt. By ensuring a clean surface, you can better understand the overall condition of the roof and address any underlying problems before sealing it.
It’s important to use suitable cleaning techniques, such as gentle scrubbing with mild detergent or pressure washing on low settings, to avoid damaging the roof surface during the cleaning process.
Inspect for Any Damage
Conducting a detailed inspection of the caravan roof is crucial to identify any existing damage, leaks, or weak spots. Inspecting roof vents, seams, edges, and joints allows for early detection of potential issues that require repair or reinforcement. Taking preventive actions based on inspection findings can shore up vulnerabilities and guarantee prolonged roof protection.
This proactive approach helps maintain the structural integrity of the caravan and minimises the risk of costly repairs down the line. Owners can avoid water intrusion and subsequent damage by paying close attention to areas prone to wear and tear, such as around AC units, skylights, and roof penetrations. Regular inspections and timely maintenance can extend the lifespan of the caravan roof, providing peace of mind during travels and ensuring a comfortable and secure living environment.
Apply Roof Sealant
Applying roof sealant is a critical step in weatherproofing and sealing your caravan roof effectively. Choosing the right sealant and using proper application techniques ensure a watertight seal that protects against leaks and water damage. DIY application of roof sealant is feasible with the right tools and instructions.

Ahead of commencing the sealing process, thorough cleaning of the roof surface is imperative to ensure the sealant adheres properly. Look for sealants specifically designed for RV or caravan roofs to ensure compatibility and longevity.
When applying the sealant, start from the edges and work your way towards the centre in smooth, even strokes to avoid air bubbles or gaps. Be mindful of weather conditions; it’s best to apply sealant on a warm, dry day to aid in curing.
Keeping a close eye on and maintaining your roof sealant regularly allows you to nip any wear or damage in the bud, ensuring optimal protection.
Check for Leaks
After applying the sealant, it is crucial to check for leaks to ensure the effectiveness of the sealing process. Conducting a thorough leak inspection helps identify any areas of concern or potential water intrusion points. Promptly addressing leaks prevents water damage and reinforces the protective capabilities of the sealed caravan roof.
Regular leak detection post-sealing is vital for maintaining the integrity of your caravan roof. By verifying the sealant’s effectiveness through leak checks, you can extend the lifespan of the seal and avoid costly repairs.
To check for leaks, start by visually inspecting the roof for any signs of water seepage or staining. Use a water hose to simulate rainfall and carefully observe for any water penetration. Early leak detection allows for timely repairs, ensuring that your caravan remains watertight and protected against the elements.
What Are Some Tips for Maintaining a Sealed Caravan Roof?
Consistent maintenance and preventive measures are key to preserving the longevity and efficacy of a sealed caravan roof. Key tips for maintaining a weatherproof and leak-free caravan roof include regularly inspecting for damage, cleaning the roof, and addressing any leaks promptly. These preventive measures help extend the roof’s lifespan and reduce maintenance costs.
During inspections, it’s crucial to scan for signs of wear and tear like cracks, peeling sealant, or loose fittings. Detecting these issues early can forestall larger problems that might necessitate extensive repairs.
Establishing a regular cleaning regimen not only maintains the aesthetic appeal of your caravan roof but also staves off debris buildup that could lead to water accumulation and potential harm. Being proactive with maintenance not only safeguards your roof but also ensures a safe and enjoyable travel experience.
Regularly Inspect for Damage
Regular inspection for damage is a proactive measure to effectively maintain a sealed caravan roof. Periodic checks for leaks, weak spots, or sealant wear allow for timely repairs and reinforcement. Following a maintenance schedule for inspections helps identify issues early and prevent extensive water damage or roof deterioration.
This diligent approach to roof maintenance not only ensures the longevity of the caravan but also safeguards the interior from potential water intrusion that can lead to structural damage and mould growth.
When conducting these inspections, it’s essential to pay attention to seams, edges, and any protrusions where leaks commonly occur. Utilising a checklist can help ensure that no areas are overlooked, providing a comprehensive assessment of the roof’s condition.
Clean the Roof Regularly
Regular roof cleaning is essential for maintaining the effectiveness of the seal on a caravan roof. Routine cleaning removes debris, mould, and contaminants that can compromise the sealant’s performance. Using appropriate cleaning supplies and techniques ensures a clean surface for sealant adhesion and enhances the overall weatherproofing capabilities of the roof.
Besides maintaining the seal’s integrity, regular roof cleaning is essential for preventing the accumulation of dirt and grime, which can cause gradual wear and tear.
To maintain the seal’s protection, the caravan roof should be cleaned at least twice a year, or more frequently if the vehicle is frequently exposed to harsh environmental conditions.
Proper cleaning practices involve using a soft-bristled brush or sponge with a gentle cleaning solution to avoid damaging the sealant. This regular maintenance not only prolongs the seal’s lifespan but also ensures that the roof remains in optimal condition for years to come.
Address Any Leaks Immediately
Swiftly addressing leaks in a sealed caravan roof is paramount to thwarting water damage and upholding the roof’s integrity. Addressing leaks promptly through proper repair techniques helps preserve the sealant’s effectiveness and prevent further structural damage. Timely leak repairs are key to avoiding costly maintenance and ensuring continuous protection.
Detecting leak sources early on and taking swift action can significantly reduce the risk of water infiltration and subsequent damage to the caravan’s interior. Regularly inspecting the roof for signs of water penetration, such as damp spots or discoloration, is essential in catching leaks before they escalate. Once a leak is identified, it is important to address it promptly by applying appropriate sealing materials or patching methods to prevent any further water ingress. By proactively managing leaks, caravan owners can safeguard their investments and avoid extensive repair expenses.
What Are Some Common Mistakes to Avoid When Sealing Your Caravan Roof?
Steering clear of common errors during the caravan roof sealing process is vital for ensuring optimal protection and efficacy. Mistakes such as improper cleaning, using the wrong sealant type, or skipping leak checks post-sealing can lead to compromised weatherproofing and potential leaks. By steering clear of these errors, you can maintain a secure and leak-free caravan roof.
Proper cleaning before sealing is crucial, as any dirt or residue left on the roof surface can interfere with the sealant’s adherence. Selecting the correct sealant based on your caravan roof material is vital to prevent compatibility issues that may result in leaks. Following the sealing procedure, routinely checking the roof for leaks or damage can nip issues in the bud, averting costly repairs in the future. These preventive measures are essential in upholding the integrity of your caravan roof.
Not Cleaning the Roof Properly
Proper roof cleaning is paramount before sealing a caravan roof to ensure optimal adhesion and sealant performance. Inadequate cleaning can leave dirt, debris, or old sealant residues that hinder the new sealant’s effectiveness. Thorough cleaning not only enhances the seal but also allows for a comprehensive assessment of the roof’s condition.
This assessment is crucial as any hidden damage or weaknesses can be addressed before applying the sealant. Neglecting proper cleaning procedures can lead to poor sealant adhesion, resulting in leaks, water damage, and potentially costly repairs. It is advisable to use mild detergents, soft brushes, and gentle techniques to clean the roof without causing any damage. Remember that a clean surface is essential for the sealant to bond effectively, ensuring the longevity of the caravan roof and maintaining its structural integrity.
Using the Wrong Type of Sealant
Selecting the correct type of sealant is crucial for the success of a caravan roof sealing project. Using the wrong sealant can result in inadequate weatherproofing, reduced protection against leaks, and premature sealant deterioration. Opting for a compatible and high-quality sealant ensures long-lasting performance and effective roof protection.
An incorrect sealant type may not adhere properly to the caravan roof surface, leading to gaps where water can seep through, damaging the interior of the caravan. This can result in costly repairs and potentially ruin your outdoor adventures.
When choosing a sealant, it’s essential to consider factors such as the material of the caravan roof, the climate conditions it will be exposed to, and the expected frequency of movement to ensure optimal adhesion and flexibility. Take time to research and consult with professionals to identify the right sealant that offers durability, flexibility, and resistance to UV rays for a well-protected caravan roof.
Not Checking for Leaks After Sealing
Failing to check for leaks post-sealing can compromise the effectiveness of the entire sealing process. Overlooking leak inspections can result in undetected vulnerabilities or sealant issues that may lead to water intrusion and damage. Thoroughly checking for leaks after sealing is vital for ensuring the roof’s watertight integrity and long-term protection.
Regular post-sealing leak checks are crucial maintenance tasks that safeguard the caravan roof against potential water damage and structural issues. By conducting thorough leak inspections, individuals can identify any weak spots in the sealant application that might allow water infiltration. Addressing leaks promptly is essential to prevent further deterioration and uphold the sealant’s ability to protect the roof from moisture and external elements. Neglecting these leak checks could compromise the structural integrity of the caravan and lead to costly repairs down the line.